This section details database specific installation and configuration requirements.
You should have the Oracle database software installed and a test database created and running. During the installation make a note of your system user password, you will need it for the test schema creation. (Note that the system user is used and not sys). You may at your discretion use an existing database however please note that HammerDB load testing can drive your system utilization to maximum levels and therefore testing an active production system is not recommended. After your database server is installed you should create a tablespace into which the test data will be installed allowing disk space according to the guide previously in this chapter. For example the following shows creating the tablespace in the ASM disk group DATA:
SQL> create bigfile tablespace tpcctab datafile '+DATA' size 100g;
If you are running HammerDB against Oracle on Windows add the following entry to your SQLNET.ORA file for the reasons described in the HammerDB release notes.
SQLNET.AUTHENTICATION_SERVICES = (NTS)
DIAG_ADR_ENABLED=OFF DIAG_SIGHANDLER_ENABLED=FALSE
DIAG_DDE_ENABLED=FALSE
You must be able to connect from your load generation server to your SUT database server across the network using Oracle TNS. This will involve successful configuration of your listener on the SUT database server and the tnsnames.ora file on the load generation server. You can troubleshoot connectivity issues using the ping, tnsping and sqlplus commands on the load generation client and the lsnrctl command on the SUT database server. For example a successful tnsping test looks as follows:
[oracle@MERLIN ~]$ tnsping PDB1

TNS Ping Utility for Linux: Version 12.1.0.1.0 - Production on 21-MAY-2014 05:40:49

Copyright (c) 1997, 2013, Oracle.  All rights reserved.

Used parameter files:
/u01/app/oracle/product/12.1.0/dbhome_1/network/admin/sqlnet.ora

Used TNSNAMES adapter to resolve the alias
Attempting to contact (DESCRIPTION = (ADDRESS = (PROTOCOL = TCP)(HOST = merlin)(PORT = 1521)) (CONNECT_DATA = (SERVER = DEDICATED) (SERVICE_NAME = pdb1)))
OK (30 msec)
Note that where the instant client is being used on the load generation server you should configure the TNS_ADMIN environment variable to the location where the tnsnames.ora and sqlnet.ora files are installed. When you have installed the load generation server and SUT database and have verified that you can communicate between them using Oracle TNS you can proceed to building a test schema.
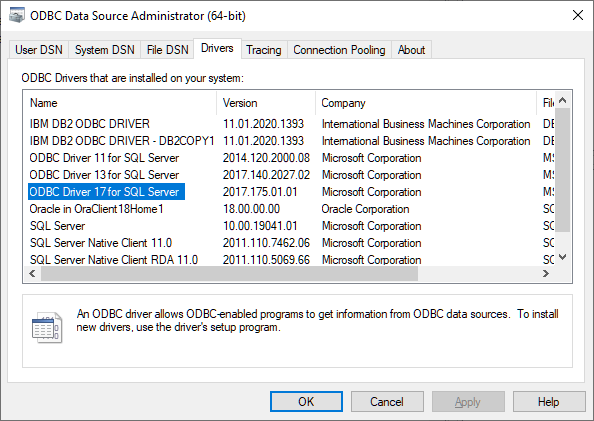
You will have configured Microsoft SQL Server during installation to authenticate either with Windows Authentication or with SQL Server and Windows Authentication. HammerDB will permit either method to be used however you must have the corresponding configuration on your SQL Server. Additionally your chosen method of authentication is required to be compatible with your chosen ODBC driver. To discover the available drivers use the ODBC Data Source Administrator tool on Windows and the command database drivers on Linux. The driver name should be entered into HammerDB exactly as shown in the Data Source Administrator. The default value is “ODBC Driver 17 for SQL Server” for both Windows and Linux.
To connect to Db2 requires the IBM CLI interface. Note that CLI in this context means "call level interface" and should not be confused the with the HammerDB command-line interface. Db2 CLI is the 'C' language interface that HammerDB uses. ODBC is not used for HammerDB connectivity to Db2 however both ODBC and CLI drivers are packaged together and therefore for Db2 connectivity it is necessary to install the Db2 client software IBM Data Server Driver for ODBC and CLI. This is also typically installed with the Db2 database software. Configure your db2dsdriver.cfg file with the hostname, port and database that you have created on the server.
db2inst1:~/odbc_cli/clidriver/cfg> more db2dsdriver.cfg
<?xml version="1.0" encoding="UTF-8" standalone="no" ?>
<configuration>
  <dsncollection>
    <dsn alias="TPCC" host="db2v1064bit" name="TPCC" port="50001"/>
  </dsncollection>

  <databases>
    <database host="db2v1064bit" name="TPCC" port="50001"/>
  </databases>
</configuration>
Options can be set in the db2cli.ini file.
[db2inst1@~/sqllib/cfg]$ more db2cli.ini
[TPCC]
UID=db2inst1
PWD=ibmdb2
SysSchema=SYSIBM
SchemaList=”’SYSIBM’,’TPCC’”
DeferredPrepare=1
ConnectTimeout=10
ReceiveTimeout=120
LockTimeout=-1
AppendForFetchOnly=0
AutoCommit=1
ConnectType=1
CursorHold=OFF
TxnIsolation=1
StmtConcentrator=OFF
You should have the Db2 database software installed and ready to accept connections as shown below.
db2inst1~]$ db2stop
04/12/2015 10:12:27     0   0   SQL1064N  DB2STOP processing was successful.
SQL1064N  DB2STOP processing was successful.
[db2inst1~]$ db2start
12/04/2015 10:12:31     0   0   SQL1063N  DB2START processing was successful.
SQL1063N  DB2START processing was successful.
[db2inst1~]$ db2
(c) Copyright IBM Corporation 1993,2007
Command Line Processor for DB2 Client 10.5.5

You can issue database manager commands and SQL statements from the command
prompt. For example:
    db2 => connect to sample
    db2 => bind sample.bnd

For general help, type: ?.
For command help, type: ? command, where command can be
the first few keywords of a database manager command. For example:
 ? CATALOG DATABASE for help on the CATALOG DATABASE command
 ? CATALOG          for help on all of the CATALOG commands.

To exit db2 interactive mode, type QUIT at the command prompt. Outside
interactive mode, all commands must be prefixed with 'db2'.
To list the current command option settings, type LIST COMMAND OPTIONS.

For more detailed help, refer to the Online Reference Manual.

db2 =>
With Db2 installed and running manually create and configure a Db2 Database according to your requirements. Pay particular attention to setting a LOGFILSIZ appropriate to your environment, otherwise you are likely to receive a transaction log full error message during the schema build. Additionally HammerDB is bufferpool and tablespace aware and therefore you may wish to create additional bufferpools specific to the tables that you are going create. The example below shows a configuration where a separate bufferpool has been created for each table solely to illustrate the usage of HammerDB parameters. You should also use the db2set command to set parameters appropriate to your system, for example setting DB2_LARGE_PAGE_MEM=DB for a large page configuration. Note that the commands below are examples only and should not (and are not) recommendations for optimal performance.
[db2inst1@ ~]$ db2 create database tpcc pagesize 8 k
DB20000I  The CREATE DATABASE command completed successfully.
[db2inst1@ ~]$ db2 update db cfg for tpcc using PCKCACHESZ 1631072
DB20000I  The UPDATE DATABASE CONFIGURATION command completed successfully.
[db2inst1@ ~]$ db2 update db cfg for tpcc using LOGFILSIZ 1048572
DB20000I  The UPDATE DATABASE CONFIGURATION command completed successfully.
[db2inst1@ ~]$ db2 update db cfg for tpcc using LOGPRIMARY 25
DB20000I  The UPDATE DATABASE CONFIGURATION command completed successfully.
[db2inst1@ ~]$ db2 update db cfg for tpcc using LOGSECOND 5
DB20000I  The UPDATE DATABASE CONFIGURATION command completed successfully.
[db2inst1@ ~]$ db2 update db cfg for tpcc using LOGBUFSZ 17264
DB20000I  The UPDATE DATABASE CONFIGURATION command completed successfully.
[db2inst1@ ~]$ db2 update db cfg for tpcc using MINCOMMIT 1
DB20000I  The UPDATE DATABASE CONFIGURATION command completed successfully.
[db2inst1@ ~]$ db2 update db cfg for tpcc using NUM_IOSERVERS AUTOMATIC
DB20000I  The UPDATE DATABASE CONFIGURATION command completed successfully.
[db2inst1@ ~]$ db2 update db cfg for tpcc using DFT_PREFETCH_SZ AUTOMATIC
DB20000I  The UPDATE DATABASE CONFIGURATION command completed successfully.
[db2inst1@ ~]$ db2 update db cfg for tpcc using LOCKTIMEOUT 15
DB20000I  The UPDATE DATABASE CONFIGURATION command completed successfully.
[db2inst1@ ~]$ db2 update db cfg for tpcc using SOFTMAX 2500
DB20000I  The UPDATE DATABASE CONFIGURATION command completed successfully.
[db2inst1@ ~]$
[db2inst1@ ~]$ db2 connect to tpcc

   Database Connection Information

 Database server        = DB2/LINUXX8664 10.5.5
 SQL authorization ID   = DB2INST1
 Local database alias   = TPCC

[db2inst1@ ~]$ db2 create bufferpool C_BP immediate size 2500000 pagesize 8k
DB20000I  The SQL command completed successfully.
[db2inst1@ ~]$ db2 create large tablespace C_TS pagesize 8k managed by automatic storage bufferpool C_BP
DB20000I  The SQL command completed successfully.
[db2inst1@ ~]$ db2 create bufferpool D_BP immediate size 500000 pagesize 4k
DB20000I  The SQL command completed successfully.
[db2inst1@ ~]$ db2 create large tablespace D_TS pagesize 4k managed by automatic storage bufferpool D_BP
DB20000I  The SQL command completed successfully.
[db2inst1@ ~]$ db2 create bufferpool W_BP immediate size 500000 pagesize 4k
DB20000I  The SQL command completed successfully.
[db2inst1@ ~]$ db2 create large tablespace W_TS pagesize 4k managed by automatic storage bufferpool W_BP
DB20000I  The SQL command completed successfully.
[db2inst1@ ~]$ db2 create bufferpool I_BP immediate size 500000 pagesize 4k
DB20000I  The SQL command completed successfully.
[db2inst1@ ~]$ db2 create large tablespace I_TS pagesize 4k managed by automatic storage bufferpool I_BP
DB20000I  The SQL command completed successfully.
[db2inst1@ ~]$ db2 create bufferpool H_BP immediate size 2000000 pagesize 8k
DB20000I  The SQL command completed successfully.
[db2inst1@ ~]$ db2 create large tablespace H_TS pagesize 8k managed by automatic storage bufferpool H_BP
DB20000I  The SQL command completed successfully.
[db2inst1@ ~]$ db2 create bufferpool S_BP immediate size 2000000 pagesize 8k
DB20000I  The SQL command completed successfully.
[db2inst1@ ~]$ db2 create large tablespace S_TS pagesize 8k managed by automatic storage bufferpool S_BP
DB20000I  The SQL command completed successfully.
[db2inst1@ ~]$ db2 create bufferpool NO_BP immediate size 3000000 pagesize 8k
DB20000I  The SQL command completed successfully.
[db2inst1@ ~]$ db2 create large tablespace NO_TS pagesize 8k managed by automatic storage bufferpool NO_BP
DB20000I  The SQL command completed successfully.
[db2inst1@ ~]$ db2 create bufferpool OR_BP immediate size 3000000 pagesize 8k
DB20000I  The SQL command completed successfully.
[db2inst1@ ~]$ db2 create large tablespace OR_TS pagesize 8k managed by automatic storage bufferpool OR_BP
DB20000I  The SQL command completed successfully.
[db2inst1@ ~]$ db2 create bufferpool OL_BP immediate size 5000000 pagesize 8k
DB20000I  The SQL command completed successfully.
[db2inst1@ ~]$ db2 create large tablespace OL_TS pagesize 8k managed by automatic storage bufferpool OL_BP
DB20000I  The SQL command completed successfully.
You should have the MySQL database software installed and running. Make sure you set a password for either the root user or a user with the correct privileges to create the TPROC-C database, for example the following on MySQL 8.0.
mysql> alter user 'root'@'localhost' identified by 'mysql';
Query OK, 0 rows affected (0.00 sec)
and the following on MySQL 5.6
-bash-4.1$ ./mysqladmin -u root password mysql
By default a MySQL installation will allow connection to the local server only, you must grant permission to connect to the MySQL database from your load generation server, the following example grants all permissions to the root user on the system called merlin.home.
mysql> grant all on *.* to root@'hummingbird.home' identified by 'mysql';
Query OK, 0 rows affected (0.00 sec)
mysql> flush privileges;
Query OK, 0 rows affected (0.00 sec)
Alternatively after the test database is created you can restrict the privileges to that databases only.
mysql> grant all on tpcc.* to root@'hummingbird.home' identified by 'mysql';
When choosing a MySQL Server to test note that HammerDB load testing can drive your system utilization to maximum levels and therefore testing an active production system is not recommended. When you have installed the load generation server and SUT database and have verified that you can communicate between them by logging in remotely you can proceed to building a test schema.
mysql@hummingbird:~> mysql -u root -p -h merlin.home
Enter password:
Welcome to the MySQL monitor.  Commands end with ; or \g.
Your MySQL connection id is 19
Server version: 5.6.17 MySQL Community Server (GPL)
Copyright (c) 2000, 2014, Oracle and/or its affiliates. All rights reserved.
Oracle is a registered trademark of Oracle Corporation and/or its
affiliates. Other names may be trademarks of their respective
owners.
Type 'help;' or '\h' for help. Type '\c' to clear the current input statement.
mysql>
You should have the MariaDB database software installed and running. Make sure you set a password for either the root user or a user with the correct privileges to create the TPROC-C database, for example.
Server version: 10.5.10-MariaDB MariaDB Server
Copyright (c) 2000, 2018, Oracle, MariaDB Corporation Ab and others.
Type 'help;' or '\h' for help. Type '\c' to clear the current input statement.
MariaDB [(none)]> SET PASSWORD FOR 'root'@localhost = PASSWORD("maria");
When choosing a MariaDB Server to test note that HammerDB load testing can drive your system utilization to maximum levels and therefore testing an active production system is not recommended. When you have installed the load generation server and SUT database and have verified that you can communicate between them by logging in remotely you can proceed to building a test schema. Note that when HammerDB is running on the same system as the MariaDB server you have the option of connecting through sockets. The socket name is defined by the MariaDB socket parameter with the HammerDB default being /tmp/mariadb.sock.
./bin/mysql -uroot -S/tmp/mariadb.sock -p
Enter password:
Welcome to the MariaDB monitor.  Commands end with ; or \g.
Your MariaDB connection id is 6
Server version: 10.5.10-MariaDB MariaDB Server
Copyright (c) 2000, 2018, Oracle, MariaDB Corporation Ab and others.
Type 'help;' or '\h' for help. Type '\c' to clear the current input statement.
MariaDB [(none)]>
You should have the PostgreSQL database software installed and a test database created and running. It is important to note that EnterpriseDB produce an enhanced version of the PostgreSQL database termed Postgres Plus Advanced Server. This version of PostgreSQL in particular includes compatibility features with the Oracle database such as PL/SQL support. Also Citus Data have produced a distributed PostgreSQL extension. For this reason the Hammer OLTP workload for PostgreSQL can operate in 3 modes. Firstly Oracle compatible mode uses PL/SQL and additional Postgres Plus Advanced Server features (such as DRITA snapshots) that will only operate against Enterprise DB Postgres Plus Advanced Server. Secondly Citus compatible mode supports distributed PostgreSQL with the Citus Data extension. Finally by not selecting Citus or Oracle compatibility HammerDB can continue to operate against a regular PostgreSQL build using native PostgreSQL features. You must ensure before proceeding with OLTP that you are aware of the version of PostgreSQL you have installed and the features available, if you wish to test Oracle compatibility then you must use Postgres Plus Advanced Server from EnterpriseDB and install in Oracle compatible mode, if you wish to use Citus Data you must be running against a Citus enabled installation either installed or in the cloud.
During the installation make a note of your postgres superuser password, you will need it for the test schema creation. You must be able to connect from your load generation server to your SUT database server across the network. Firstly check your postgresql.conf file for the listen_addresses parameter. If this is set to localhost then only connections from the local server will be permitted. Use listen_addresses = ‘*’ to permit connections from all servers. Successful network connections will also involve successful configuration of your pg_hba.conf on the SUT database server. For example the following extract from a pg_hba.conf file from a PostgreSQL 9.3 installation shows trusted local connections on the SUT permitting connection without a password and remote connections from the Load Generation server with IP address 192.168.1.67 if the correct password is supplied. Note that the syntax of pg_hba.conf has changed for different versions of PostgreSQL and you should therefore consult the PostgreSQL documentation and sections further in this document to troubleshoot connectivity issues.
# TYPE  DATABASE        USER            ADDRESS                 METHOD
# "local" is for Unix domain socket connections only
local      all       all  trust
# IPv4 local connections:
host  all  all  127.0.0.1/32 md5
host  all  all  192.168.1.67/32 md5