One of the most important concepts in analysing database performance is that of understanding scalability. When a system ‘scales’ it is able to deliver higher levels of performance proportional to the system resources available to it. In particular, this means as we add CPU cores and increase the system load, we see higher performance. The way we measure this is through a ‘performance profile’. This simply means that we run a series of tests incrementally increasing the system load until we find the peak performance. Plotting these data points enables us to understand the scalability of the database software being tested on that system.
In this example, we will compare MySQL 5.7.33 and MySQL 8.0.25 with the TPROC-C workload on a system with 2 sockets of Intel Xeon 8280L that means we have 28 cores per socket, with 56 physical CPUs and 112 logical CPUs with Hyper-Threading.
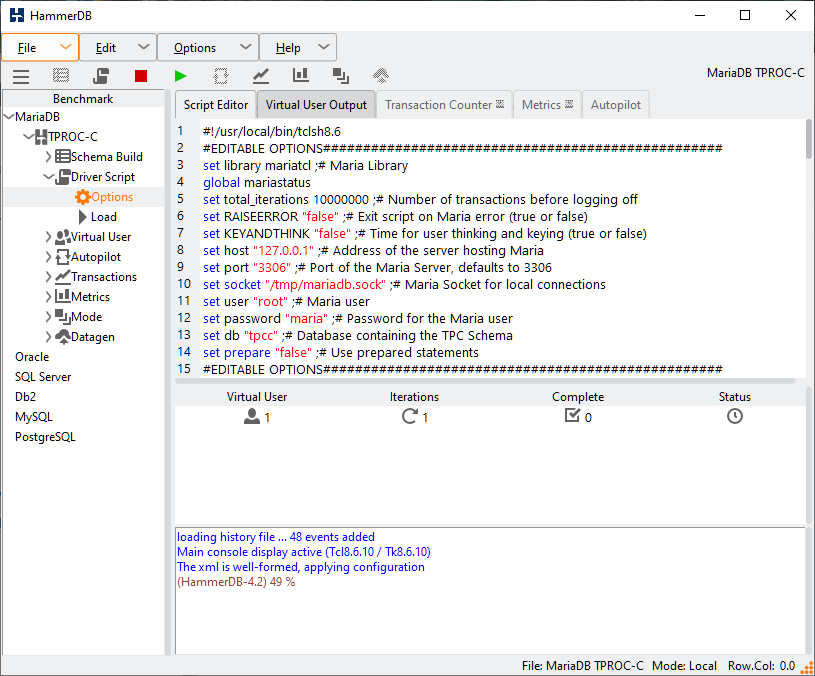
So as a first step we will install MySQL 5.7.33 and MySQL 8.0.25 and build a schema on both. In this example, we will use the HammerDB CLI and build the schema with the script as follows in both databases.
dbset db mysql
dbset bm TPC-C
vuset logtotemp 1
diset connection mysql_socket /tmp/mysql.sock
diset tpcc mysql_count_ware 800
diset tpcc mysql_num_vu 64
diset tpcc mysql_partition true
buildschema
waittocomplete
quit
Then we can run an interactive workload for a single Virtual User as follows for MySQL 8.0.25
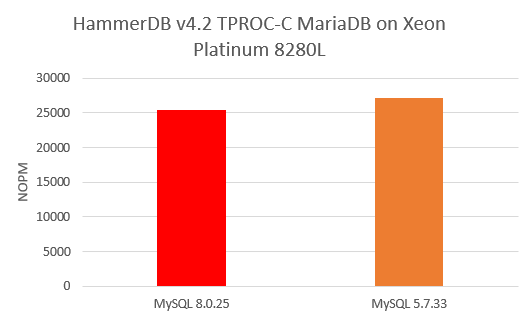
./hammerdbcli
HammerDB CLI v4.2
Copyright (C) 2003-2021 Steve Shaw
Type "help" for a list of commands
The xml is well-formed, applying configuration
hammerdb>dbset db mysql
Database set to MySQL
hammerdb>diset tpcc mysql_driver timed
Clearing Script, reload script to activate new setting
Script cleared
Changed tpcc:mysql_driver from test to timed for MySQL
hammerdb>vuset logtotemp 1
hammerdb>vuset unique 1
hammerdb>vuset vu 1
hammerdb>loadscript
Script loaded, Type "print script" to view
hammerdb>vucreate
Vuser 1 created MONITOR - WAIT IDLE
Vuser 2 created - WAIT IDLE
Logging activated
to /tmp/hammerdb_60F169935C7303E293236333.log
2 Virtual Users Created with Monitor VU
hammerdb>vurun
Vuser 1:RUNNING
Vuser 1:Beginning rampup time of 2 minutes
Vuser 2:RUNNING
Vuser 2:Processing 10000000 transactions with output suppressed...
...
hammerdb>Vuser 1:Rampup 1 minutes complete ...
Vuser 1:Rampup 2 minutes complete ...
Vuser 1:Rampup complete, Taking start Transaction Count.
Vuser 1:Timing test period of 5 in minutes
Vuser 1:1 ...,
Vuser 1:2 ...,
Vuser 1:3 ...,
Vuser 1:4 ...,
Vuser 1:5 ...,
Vuser 1:Test complete, Taking end Transaction Count.
Vuser 1:1 Active Virtual Users configured
Vuser 1:TEST RESULT : System achieved 25469 NOPM from 76873 MySQL TPM
Vuser 1:FINISHED SUCCESS
Vuser 2:FINISHED SUCCESS
ALL VIRTUAL USERS COMPLETE
and MySQL 5.7.33
hammerdb>dbset db mysql
Database set to MySQL
hammerdb>diset tpcc mysql_driver timed
Clearing Script, reload script to activate new setting
Script cleared
Changed tpcc:mysql_driver from test to timed for MySQL
hammerdb>vuset logtotemp 1
hammerdb>vuset unique 1
hammerdb>loadscript
Script loaded, Type "print script" to view
hammerdb>vuset vu 1
hammerdb>vucreate
Vuser 1 created MONITOR - WAIT IDLE
Vuser 2 created - WAIT IDLE
Logging activated
to /tmp/hammerdb_60F183575C7303E273030333.log
2 Virtual Users Created with Monitor VU
hammerdb>vurun
Vuser 1:RUNNING
Vuser 1:Beginning rampup time of 2 minutes
Vuser 2:RUNNING
Vuser 2:Processing 10000000 transactions with output suppressed...
hammerdb>Vuser 1:Rampup 1 minutes complete ...
Vuser 1:Rampup 2 minutes complete ...
Vuser 1:Rampup complete, Taking start Transaction Count.
Vuser 1:Timing test period of 5 in minutes
Vuser 1:1 ...,
Vuser 1:2 ...,
Vuser 1:3 ...,
Vuser 1:4 ...,
Vuser 1:5 ...,
Vuser 1:Test complete, Taking end Transaction Count.
Vuser 1:1 Active Virtual Users configured
Vuser 1:TEST RESULT : System achieved 27154 NOPM from 82383 MySQL TPM
Vuser 1:FINISHED SUCCESS
Vuser 2:FINISHED SUCCESS
ALL VIRTUAL USERS COMPLETE
Extracting the NOPM value from the CLI or from the log file, we found that MySQL 8.0.25 returned 25469 NOPM to MySQL 5.7.33’s 27154 NOPM meaning the older version of MySQL gave a slightly better result.
So does this mean that we can conclude that MySQL 5.7 is 1.06X faster than MySQL 8.0? Of course not, we have only run a single Virtual User and therefore not tested MySQL’s ability to manage multiple sessions running the same workload concurrently. Therefore, again using the interactive shell let us now run more tests, increasing the Virtual User count to 20.
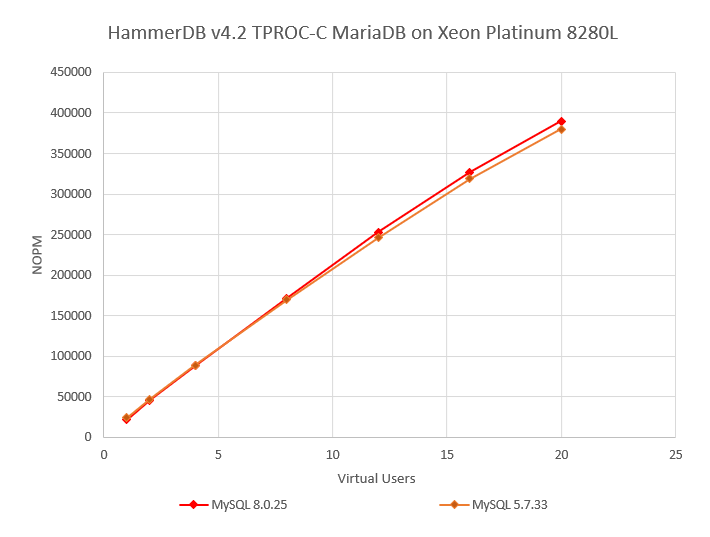
Now at 20 Virtual Users MySQL 8.0 is at 390014 TPM with MySQL 5.7 at 379972 putting MySQL 8.0 at 1.02X better than MySQL 5.7. However, again this might not be giving us the full picture, so let’s run a fully automated test up to 120 Virtual Users using the script as follows:
puts "MySQL Test Started"
dbset db mysql
dbset bm TPC-C
diset connection mysql_socket /tmp/mysql.sock
diset tpcc mysql_driver timed
diset tpcc mysql_rampup 2
diset tpcc mysql_duration 5
vuset logtotemp 1
vuset unique 1
loadscript
foreach z {1 2 4 8 12 16 20 24 28 32 36 40 44 48 52 56 60 64 68 72 76 80 84 88 92 96 100 104 108 112 116 120} {
puts "$z VU test"
vuset vu $z
vucreate
vurun
runtimer 480
vudestroy
}
puts "MySQL Test Complete"
When we graph the result, we now get a much better picture of the full capabilities of the MySQL 5.7 and 5.8 software running on the same server.
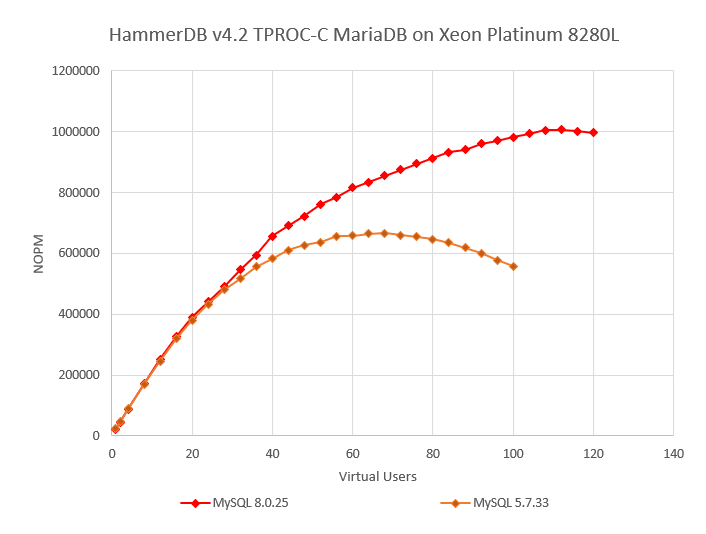
Now we can see that MySQL 8.0 reaches peak performance at 1006469 NOPM at 112 Virtual Users, with MySQL 5.7 peaking at 666407 at 68 Virtual Users, putting MySQL 8.0.25 at 1.51X over MySQL 5.7.33.
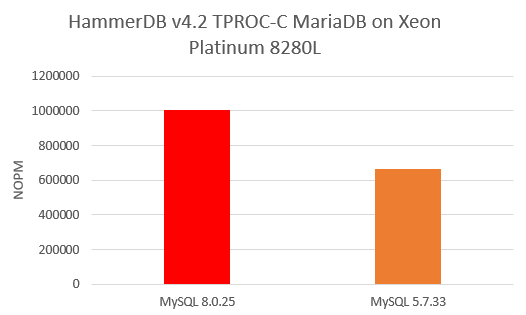
It should be clear from the performance profile that the difference in performance can be attributed to the scalability of the database software, in this case MySQL. This is the same server, same OS and same HammerDB client, the only difference is in the server software.
Crucially HammerDB can also run against Oracle, SQL Server, Db2, MariaDB and PostgreSQL on Windows and Linux, so we know that the capabilities of the server with commercial database software is actually a lot higher and also that the capabilities of the HammerDB client is also a lot higher – it is the database software and the database software alone that limits the scalability in this case.
Also important is the user experience, so we have also gathered the transaction response times with the summaries shown below for both MySQL versions at the peak performance of MySQL 5.7.33.
MySQL 8.0.25
Vuser 1:68 Active Virtual Users configured
Vuser 1:TEST RESULT : System achieved 841337 NOPM from 2550191 MySQL TPM
+-+-+-+-+-+-+-+-+-+-+-+-+-+-+-+-+-+-+-+-+-+-+-+-+-+-+-+-+-+-+-+-+-+-+-+-+-+
>>>>> SUMMARY OF 68 ACTIVE VIRTUAL USERS : MEDIAN ELAPSED TIME : 403363ms
>>>>> PROC: NEWORD
CALLS: 5775293 MIN: 0.810ms AVG: 2.401ms MAX: 57.323ms TOTAL: 13867195.952ms
P99: 4.005ms P95: 3.698ms P50: 2.316ms SD: 792.316 RATIO: 50.557%
>>>>> PROC: PAYMENT
CALLS: 5775133 MIN: 0.435ms AVG: 1.042ms MAX: 56.802ms TOTAL: 6022416.890ms
P99: 2.052ms P95: 1.576ms P50: 0.978ms SD: 401.213 RATIO: 21.957%
>>>>> PROC: DELIVERY
CALLS: 578532 MIN: 4.001ms AVG: 8.929ms MAX: 67.479ms TOTAL: 5165817.194ms
P99: 12.438ms P95: 11.282ms P50: 9.063ms SD: 1831.663 RATIO: 18.834%
>>>>> PROC: SLEV
CALLS: 578436 MIN: 0.752ms AVG: 2.468ms MAX: 56.045ms TOTAL: 1427926.455ms
P99: 3.585ms P95: 3.230ms P50: 2.459ms SD: 560.309 RATIO: 5.206%
>>>>> PROC: OSTAT
CALLS: 576834 MIN: 0.286ms AVG: 0.955ms MAX: 39.063ms TOTAL: 551043.284ms
P99: 1.796ms P95: 1.432ms P50: 0.912ms SD: 334.873 RATIO: 2.009%
+-+-+-+-+-+-+-+-+-+-+-+-+-+-+-+-+-+-+-+-+-+-+-+-+-+-+-+-+-+-+-+-+-+-+-+-+-+
MySQL 5.7.33
Vuser 1:68 Active Virtual Users configured
Vuser 1:TEST RESULT : System achieved 655295 NOPM from 1986131 MySQL TPM
+-+-+-+-+-+-+-+-+-+-+-+-+-+-+-+-+-+-+-+-+-+-+-+-+-+-+-+-+-+-+-+-+-+-+-+-+-+
>>>>> SUMMARY OF 68 ACTIVE VIRTUAL USERS : MEDIAN ELAPSED TIME : 403998ms
>>>>> PROC: NEWORD
CALLS: 4542033 MIN: 0.714ms AVG: 3.082ms MAX: 42.174ms TOTAL: 14000329.326ms
P99: 5.124ms P95: 4.720ms P50: 3.001ms SD: 994.571 RATIO: 50.962%
>>>>> PROC: DELIVERY
CALLS: 453821 MIN: 3.020ms AVG: 13.931ms MAX: 58.857ms TOTAL: 6322207.859ms
P99: 19.838ms P95: 17.926ms P50: 13.975ms SD: 2826.392 RATIO: 23.013%
>>>>> PROC: PAYMENT
CALLS: 4544693 MIN: 0.352ms AVG: 1.157ms MAX: 37.108ms TOTAL: 5261866.428ms
P99: 2.231ms P95: 1.734ms P50: 1.096ms SD: 429.929 RATIO: 19.154%
>>>>> PROC: SLEV
CALLS: 455338 MIN: 0.686ms AVG: 2.407ms MAX: 54.447ms TOTAL: 1096000.372ms
P99: 3.253ms P95: 3.048ms P50: 2.381ms SD: 501.128 RATIO: 3.990%
>>>>> PROC: OSTAT
CALLS: 454731 MIN: 0.252ms AVG: 0.946ms MAX: 28.175ms TOTAL: 430240.916ms
P99: 1.856ms P95: 1.458ms P50: 0.905ms SD: 321.024 RATIO: 1.566%
+-+-+-+-+-+-+-+-+-+-+-+-+-+-+-+-+-+-+-+-+-+-+-+-+-+-+-+-+-+-+-+-+-+-+-+-+-+
What we can see is that with MySQL 8.0.25 we have both higher throughput and lower response times. MySQL 8.0 therefore offers a higher capacity for load than MySQL 5.7 on this server.
It should also be clear that testing on a single socket environment may not give you an accurate comparison of database software designed to take advantage of multiple CPU sockets. In this case we tested MySQL vs MySQL however you should exercise caution in drawing conclusions about database software capabilities without having first tested in a server environment.